優化配置Wordpress和Nginx降低服務器響應時間,最便宜服務器跑多插件大模板網站
2018-09-10
约 2464 字
预计阅读 5 分钟
昨天兒子按照前麵我寫的教程作出了人生第一個博客,教程參見八步教程 – 從零基礎到2小時建立Google PageSpeed Insights100分、安全度A級的博客站點平台
接下來的問題雖然他還沒有遇到,但我卻早有先見。
因為打算服務器的費用由他自己想辦法賺錢支付,目前讓他采購的是Vultr最便宜的服務器,3.5美金每月,1個CPU,內存隻有512MB的最mini型服務器。
而wordpress是非常吃內存的CMS係統,區區512MB估計過不幾天增加幾個插件和模板,服務器的響應時間可能就不能滿足Google Speed Insights的要求了。
就如我本人這個博客,初始的時候速度不慢,但使用了DIVI,增加了不少其他插件後,在Google Speed Insights的測試結果,服務器響應時間就超過了200ms,速度也明顯可以肉眼看到非常慢。
網速是網站之本,這個必須要解決,經過一番google,找到了解決方案,為了給兒子做一個參考,還是用fxdiary.com走一遍。
本解決方案部分參考了Howtoforge的帖子Configuring Your LEMP System (Linux, nginx, MySQL, PHP-FPM) For Maximum Performance 感謝互聯網。
不過該帖是數年前寫就,主要針對PHP5,今次教程本人用PHP7.2一步步驗證,親測有效
還是老規矩,如果需要你自己修改的地方,本帖會紅色注明。
好首先遠程登錄fxdiary.com服務器
為mount選項添加noatime和nodiratime,這是為了降低硬盤讀寫率,命令如下:
打開文件後,找到
將之修改為紅色部分
存盤退出,再運行
運行下列命令編輯nginx.conf文件
如下修改
keepalive_timeout從缺省值65秒改為更合理的2秒
開啟文件的緩存
開啟ssl-session的緩存
開啟fastCGI 緩存
/var/cache/nginx/緩存目錄必須存在,而且要有權限寫入,所以存盤退出後,要運行下列命令
這樣nginx.conf就修改完了,我這裏貼上fxdiary.com的nginx.conf全文供參考
運行
增加fastcgi的緩存功能,但需要設置成登錄進wordpress編輯模式時不緩存
這樣/etc/nginx/sites-available/fxdiary.com的全文如下:
假如突然當機了,php可以自動重啟。運行命令
將emergency的設置更改為如下:
CTRL-X存盤退出。
運行下列命令
打開www.conf文件後找到如下語句,更改為紅色標注部分
改成socket方式後,可能會經常遇到502錯誤,需要增加每個socket的連接數。運行下列命令
打開文件後在最後一行加上
CTRL-X存盤退出,然後運行如下命令激活
至此全部配置完成,運行下列命令重啟php和nginx
到Google Pagespeed Insights檢查一下,“Reduce server response time”的優化建議已經沒有了。
加了fastCGI cache的設置,網站速度大幅增加,用pingdom再測試本站,用了商業模板divi,加了許多重型的插件,網速仍然沒有太大影響,重要的是,現在本站也隻是用的5美元每月的次低配置服務器。

更新:對於我們經常更新帖子的博客來說,用cache也是有雙刃劍的,常常發表完後隻是初稿,修修改改是常有的,但是cache會保存了原有的帖子,對用戶而言,在一定時限內是看不到更新版的。
每次更新帖子,需要刪除緩存。對我們這個配置而言就是登錄到遠程服務器後運行:
那能不能自動實現,編輯完帖子自動去刪除緩存?
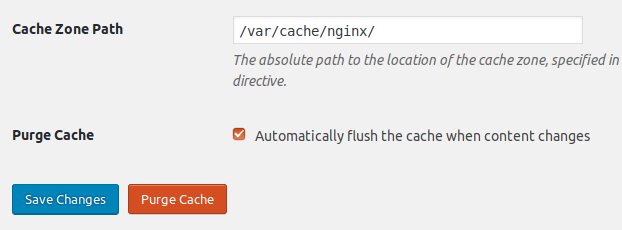
還是那句老話,互聯網從來不缺乏高風亮節者,又找到一個免費插件。Nginx Cache
設置也很簡單,將我們的cache目錄貼上就好了。
好了,編輯好了存盤,用其他設備打開看這個帖子,更新了。說明插件無問題。
以後就可以安心的編輯修改,而不用煩惱緩存清除的事情了。這就是“自動化”的好處。
接下來的問題雖然他還沒有遇到,但我卻早有先見。
因為打算服務器的費用由他自己想辦法賺錢支付,目前讓他采購的是Vultr最便宜的服務器,3.5美金每月,1個CPU,內存隻有512MB的最mini型服務器。
而wordpress是非常吃內存的CMS係統,區區512MB估計過不幾天增加幾個插件和模板,服務器的響應時間可能就不能滿足Google Speed Insights的要求了。
就如我本人這個博客,初始的時候速度不慢,但使用了DIVI,增加了不少其他插件後,在Google Speed Insights的測試結果,服務器響應時間就超過了200ms,速度也明顯可以肉眼看到非常慢。
網速是網站之本,這個必須要解決,經過一番google,找到了解決方案,為了給兒子做一個參考,還是用fxdiary.com走一遍。
本解決方案部分參考了Howtoforge的帖子Configuring Your LEMP System (Linux, nginx, MySQL, PHP-FPM) For Maximum Performance 感謝互聯網。
不過該帖是數年前寫就,主要針對PHP5,今次教程本人用PHP7.2一步步驗證,親測有效
還是老規矩,如果需要你自己修改的地方,本帖會紅色注明。
降低服務器硬盤不必要的讀寫要求
好首先遠程登錄fxdiary.com服務器
ssh jesse@fxdiary.com為mount選項添加noatime和nodiratime,這是為了降低硬盤讀寫率,命令如下:
sudo nano /etc/fstab打開文件後,找到
errors=remount-ro 0 1將之修改為紅色部分
errors=remount-ro,noatime,nodiratime,usrjquota=quota.user,grpjquota=quota.group,jqfmt=vfsv0 0 1存盤退出,再運行
sudo mount -o remount /配置nginx conf文件
運行下列命令編輯nginx.conf文件
sudo nano /etc/nginx/nginx.conf如下修改
http {
...
sendfile on;
tcp_nopush on;
tcp_nodelay on;
keepalive_timeout 2;
types_hash_max_size 2048;
server_tokens off;
...
}keepalive_timeout從缺省值65秒改為更合理的2秒
開啟文件的緩存
http {
...
##
# File Cache Settings
##
open_file_cache max=5000 inactive=20s;
open_file_cache_valid 30s;
open_file_cache_min_uses 2;
open_file_cache_errors on;
...
}開啟ssl-session的緩存
http {
...
ssl_session_cache shared:SSL:10m;
ssl_session_timeout 10m;
ssl_ciphers HIGH:!aNULL:!MD5;
ssl_protocols TLSv1 TLSv1.1 TLSv1.2; # Dropping SSLv3, ref: POODLE
ssl_prefer_server_ciphers on;
...
}開啟fastCGI 緩存
http {
...
## Nginx FastCGI Cache
fastcgi_cache_path /var/cache/nginx/ levels=1:2 keys_zone=cachezone:10m max_size=2g inactive=60m;
fastcgi_cache_key $scheme$request_method$host$request_uri;
fastcgi_cache_lock on;
fastcgi_cache_revalidate on;
fastcgi_cache_background_update on;
fastcgi_cache_use_stale error timeout invalid_header updating http_500;
fastcgi_cache_valid any 60m;
fastcgi_pass_header Set-Cookie;
fastcgi_pass_header Cookie;
fastcgi_ignore_headers Cache-Control Expires Set-Cookie;
...
}/var/cache/nginx/緩存目錄必須存在,而且要有權限寫入,所以存盤退出後,要運行下列命令
sudo mkdir /var/cache/nginx
sudo chown www-data:www-data /var/cache/nginx這樣nginx.conf就修改完了,我這裏貼上fxdiary.com的nginx.conf全文供參考
user www-data;
worker_processes auto;
pid /run/nginx.pid;
include /etc/nginx/modules-enabled/*.conf;
events {
worker_connections 768;
# multi_accept on;
}
http {
##
# Basic Settings
##
sendfile on;
tcp_nopush on;
tcp_nodelay on;
keepalive_timeout 2;
types_hash_max_size 2048;
server_tokens off;
# server_names_hash_bucket_size 64;
# server_name_in_redirect off;
open_file_cache max=5000 inactive=20s;
open_file_cache_valid 30s;
open_file_cache_min_uses 2;
open_file_cache_errors on;
include /etc/nginx/mime.types;
default_type application/octet-stream;
##
# SSL Settings
##
ssl_session_cache shared:SSL:10m;
ssl_session_timeout 10m;
ssl_ciphers HIGH:!aNULL:!MD5;
ssl_protocols TLSv1 TLSv1.1 TLSv1.2;
ssl_prefer_server_ciphers on;
##
# Logging Settings
##
access_log /var/log/nginx/access.log;
error_log /var/log/nginx/error.log;
##
# Gzip Settings
##
gzip on;
gzip_vary on;
gzip_proxied any;
gzip_comp_level 6;
gzip_buffers 16 8k;
gzip_http_version 1.1;
gzip_types text/plain text/css application/json application/javascript text/xml application/xml application/xml+rss text/javascript;
##
## Nginx FastCGI Cache
fastcgi_cache_path /var/cache/nginx/ levels=1:2 keys_zone=cachezone:10m max_size=2g inactive=60m;
fastcgi_cache_key $scheme$request_method$host$request_uri;
fastcgi_cache_lock on;
fastcgi_cache_revalidate on;
fastcgi_cache_background_update on;
fastcgi_cache_use_stale error timeout invalid_header updating http_500;
fastcgi_cache_valid any 60m;
fastcgi_pass_header Set-Cookie;
fastcgi_pass_header Cookie;
fastcgi_ignore_headers Cache-Control Expires Set-Cookie;
# Virtual Host Configs
##
include /etc/nginx/conf.d/*.conf;
include /etc/nginx/sites-enabled/*;
}配置虛擬主機的文件
運行
sudo nano /etc/nginx/sites-available/fxdiary.com增加fastcgi的緩存功能,但需要設置成登錄進wordpress編輯模式時不緩存
location ~ \.php$ {
include snippets/fastcgi-php.conf;
fastcgi_pass unix:/var/run/php/php7.2-fpm.sock;
fastcgi_param SCRIPT_FILENAME $document_root$fastcgi_script_name;
set $skip_cache 0;
# POST requests and url's with a query string should always skip cache
if ($request_method = POST) {
set $skip_cache 1;
}
if ($query_string != "") {
set $skip_cache 1;
}
# Don't cache url's containing the following segments
if ($request_uri ~* "/wp-admin/|/xmlrpc.php|wp-.*.php|/feed/|index.php|sitemap(_index)?.xml") {
set $skip_cache 1;
}
# Don't use the cache for logged in users or recent commenters
if ($http_cookie ~* "comment_author|wordpress_[a-f0-9]+|wp-postpass|wordpress_no_cache|wordpress_logged_in") {
set $skip_cache 1;
}
# (for some reason, add_header fails if included in prior if-block)
if ($skip_cache = 1) {
add_header Set-Cookie "_mcnc=1; Max-Age=2; Path=/";
add_header X-Microcachable "0";
}
# Bypass cache if no-cache cookie is set
if ($http_cookie ~* "_mcnc") {
set $skip_cache 1;
}
fastcgi_cache_bypass $skip_cache;
fastcgi_no_cache $skip_cache;
fastcgi_cache cachezone;
include fastcgi_params;
fastcgi_buffer_size 128k;
fastcgi_connect_timeout 60s;
fastcgi_send_timeout 60s;
fastcgi_read_timeout 60s;
fastcgi_buffers 256 16k;
fastcgi_busy_buffers_size 256k;
fastcgi_temp_file_write_size 256k;
}這樣/etc/nginx/sites-available/fxdiary.com的全文如下:
server {
listen 80;
listen [::]:80; ## listen for ipv6
server_name fxdiary.com www.fxdiary.com;
return 301 https://$server_name$request_uri;
}
server {
listen 443 ssl;
listen [::]:443 ssl; # managed by Certbot
server_name fxdiary.com www.fxdiary.com;
root /var/www/html;
index index.php index.html index.htm index.nginx-debian.html;
location = /favicon.ico { log_not_found off; access_log off; }
location = /robots.txt { log_not_found off; access_log off; allow all; }
location ~* \.(css|gif|ico|jpeg|jpg|js|png|woff)$ {
expires max;
log_not_found off;
}
location / {
try_files $uri $uri/ /index.php$is_args$args;
}
location ~ \.php$ {
include snippets/fastcgi-php.conf;
fastcgi_pass unix:/var/run/php/php7.2-fpm.sock;
fastcgi_param SCRIPT_FILENAME $document_root$fastcgi_script_name;
set $skip_cache 0;
# POST requests and url's with a query string should always skip cache
if ($request_method = POST) {
set $skip_cache 1;
}
if ($query_string != "") {
set $skip_cache 1;
}
# Don't cache url's containing the following segments
if ($request_uri ~* "/wp-admin/|/xmlrpc.php|wp-.*.php|/feed/|index.php|sitemap(_index)?.xml") {
set $skip_cache 1;
}
# Don't use the cache for logged in users or recent commenters
if ($http_cookie ~* "comment_author|wordpress_[a-f0-9]+|wp-postpass|wordpress_no_cache|wordpress_logged_in") {
set $skip_cache 1;
}
# (for some reason, add_header fails if included in prior if-block)
if ($skip_cache = 1) {
add_header Set-Cookie "_mcnc=1; Max-Age=2; Path=/";
add_header X-Microcachable "0";
}
# Bypass cache if no-cache cookie is set
if ($http_cookie ~* "_mcnc") {
set $skip_cache 1;
}
fastcgi_cache_bypass $skip_cache;
fastcgi_no_cache $skip_cache;
fastcgi_cache cachezone;
include fastcgi_params;
fastcgi_buffer_size 128k;
fastcgi_connect_timeout 60s;
fastcgi_send_timeout 60s;
fastcgi_read_timeout 60s;
fastcgi_buffers 256 16k;
fastcgi_busy_buffers_size 256k;
fastcgi_temp_file_write_size 256k;
}
location ~ /\.ht {
deny all;
}
ssl_certificate /etc/letsencrypt/live/fxdiary.com/fullchain.pem;
ssl_certificate_key /etc/letsencrypt/live/fxdiary.com/privkey.pem;
include /etc/letsencrypt/options-ssl-nginx.conf;
ssl_dhparam /etc/letsencrypt/ssl-dhparams.pem;
}PHP-FPM緊急情況設置
假如突然當機了,php可以自動重啟。運行命令
sudo nano /etc/php/7.2/fpm/php-fpm.conf將emergency的設置更改為如下:
; If this number of child processes exit with SIGSEGV or SIGBUS within the time
; interval set by emergency_restart_interval then FPM will restart. A value
; of '0' means 'Off'.
; Default Value: 0
emergency_restart_threshold = 10
; Interval of time used by emergency_restart_interval to determine when
; a graceful restart will be initiated. This can be useful to work around
; accidental corruptions in an accelerator's shared memory.
; Available Units: s(econds), m(inutes), h(ours), or d(ays)
; Default Unit: seconds
; Default Value: 0
emergency_restart_interval = 1mCTRL-X存盤退出。
降低網絡開銷,將TCP更換為UNIX的socket.
運行下列命令
sudo nano /etc/php/7.2/fpm/pool.d/www.conf打開www.conf文件後找到如下語句,更改為紅色標注部分
; Set permissions for unix socket, if one is used. In Linux, read/write
; permissions must be set in order to allow connections from a web server. Many
; BSD-derived systems allow connections regardless of permissions.
; Default Values: user and group are set as the running user
; mode is set to 0660
listen.owner = www-data
listen.group = www-data
listen.mode = 0660改成socket方式後,可能會經常遇到502錯誤,需要增加每個socket的連接數。運行下列命令
sudo nano /etc/sysctl.conf打開文件後在最後一行加上
net.core.somaxconn = 4096CTRL-X存盤退出,然後運行如下命令激活
sudo sysctl -p至此全部配置完成,運行下列命令重啟php和nginx
sudo service php7.2-fpm restart
sudo service nginx restart檢查成果
到Google Pagespeed Insights檢查一下,“Reduce server response time”的優化建議已經沒有了。
加了fastCGI cache的設置,網站速度大幅增加,用pingdom再測試本站,用了商業模板divi,加了許多重型的插件,網速仍然沒有太大影響,重要的是,現在本站也隻是用的5美元每月的次低配置服務器。

更新:對於我們經常更新帖子的博客來說,用cache也是有雙刃劍的,常常發表完後隻是初稿,修修改改是常有的,但是cache會保存了原有的帖子,對用戶而言,在一定時限內是看不到更新版的。
每次更新帖子,需要刪除緩存。對我們這個配置而言就是登錄到遠程服務器後運行:
sudo rm -rf /var/cache/nginx/*那能不能自動實現,編輯完帖子自動去刪除緩存?
還是那句老話,互聯網從來不缺乏高風亮節者,又找到一個免費插件。Nginx Cache
設置也很簡單,將我們的cache目錄貼上就好了。
好了,編輯好了存盤,用其他設備打開看這個帖子,更新了。說明插件無問題。
以後就可以安心的編輯修改,而不用煩惱緩存清除的事情了。這就是“自動化”的好處。
相关文章:
- 2018/08/30 加入翻譯插件、盤點博客的經濟帳
- 2018/09/02 八步教程 - 從零基礎到2小時建立Google PageSpeed Insights100分、安全度A級的博客站點平台
- 2018/08/26 轉移wordpress數據庫升級Ubuntu
- 2018/08/28 優化網站Pagespeed Insights分數提到到90以上
- 2018/08/27 網站初步完成,再去Google PageSpeed Insights審核

Jesse Lau
網名遁去的一,簡稱遁一。2012年定居新西蘭至今,自由職業者。
本文采用知識共享署名 4.0 國際許可協議進行許可。簡而言之,可隨意轉發轉載,轉載請注明出處。