How to Create Zoom Image Hover Effects with Transparent Text And How to Remove Adsense Auto Ads from Homepage in Extra Theme
2018-09-23
601 words
3 mins read
After a day of renovation, I felt that the fullwidth slider on the front page didn't seem to be necessary, and it was not clear to say what my website was talking about.
Using EXTRA's image module to add a picture is very simple, however, we can not add text on the image.
So let's polish a dynamic effect with CSS.

Add a text module and write the code below

Then add the following code to the CUSTOM CSS of EXTRA THEME OPTION:
Show the demo on this page.

Website Programing, Internet Marketing, Forex Trading, Billiard, Darts And I Can Stand On One Leg For 30 Minutes With My Eyes Closed. ☺
This method has nothing to do with EXTRA or DIVI, and you do not need to find their ID or class.
Simple is best. Just use basic CSS code to solve problems.
Yesterday, after adding the ADSENSE auto ads code, I found out there are many advertisements on the homepage this morning, making the homepage difficult to read.
So I decided not to advertise on the homepage.
Google itself has certain requirements for the quality of the pages on which the advertisements are placed. If it is accidentally placed on a page that does not meet the requirements, it will incur a penalty for the account.
For blogs, the most quality pages are frequently updated posts, not the home page or pages about authors, contacts, etc.
Therefore, you need to find a way to block the ad code of other pages, and only keep the code inside the post.
If you only use the AD Unit, EXTRA is easy to implement. It can be set directly in THEME OPTION.

Only advertise in the post, there are two built-in ways, two ads before the post and after the post, this can be directly attached to the code of the Google ad unit.
But Google's AUTO ADS is required to be posted in the head of HTML. This will lead to advertising all pages of the website, which is also a great disadvantage to the user interface.
It seems that I need to change the source code now.
WordPress has a very simple function to determine whether it is a post or something else.
We open the editor to find the header.php file of the EXTRA template, and paste the following code on the line </ HEAD>:

Save and test it. There is no Google's auto ads code on the homepage or on the page now.
Using EXTRA's image module to add a picture is very simple, however, we can not add text on the image.
So let's polish a dynamic effect with CSS.
How to Create Zoom Image Hover Effects with Transparent Text
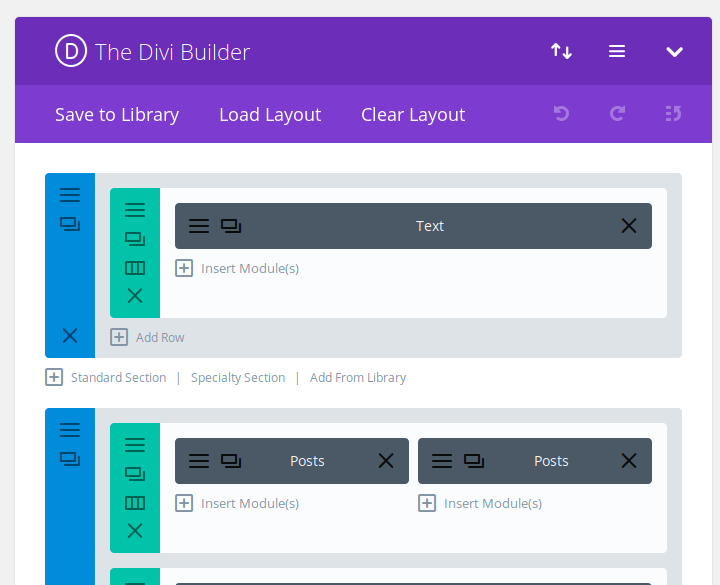
Add a text module and write the code below
<div class="zoomimg-container">
<img class="zoomimg" style="width: 100%;" src="/placeholder.svg" data-src="https://jesselau.com/wp-content/uploads/2018/09/jesselaublog-1.jpg" />
<div class="zoomimg-content">
<h1>Welcome to Jesse Lau's Blog</h1>
Website Programing, Internet Marketing, Forex Trading, Billiard, Darts And I Can Stand On One Leg For 30 Minutes With My Eyes Closed. ☺
</div>
</div>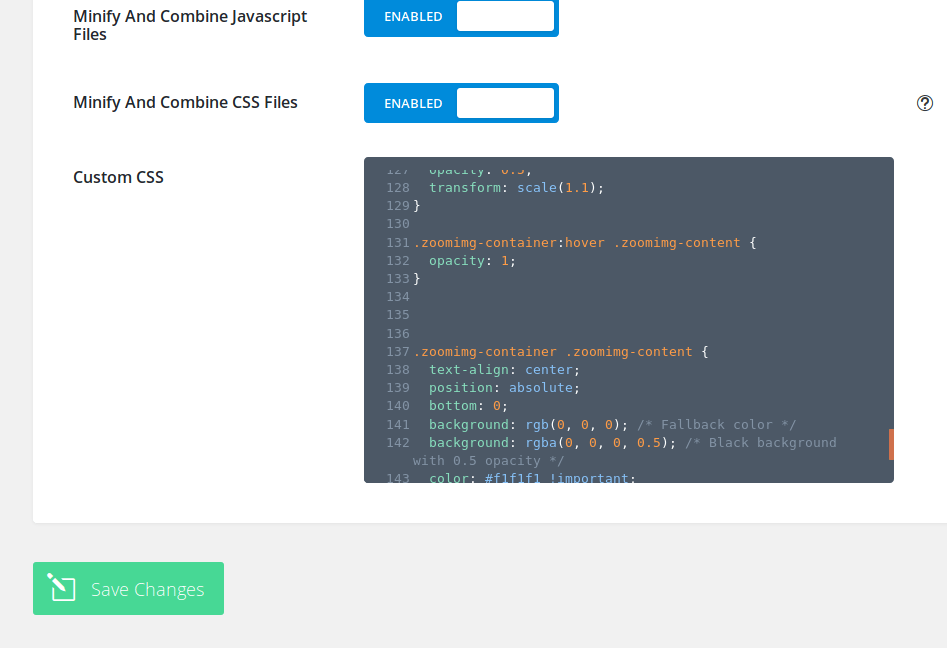
Then add the following code to the CUSTOM CSS of EXTRA THEME OPTION:
.zoomimg-container {
position: relative;
width: 100%;
overflow: hidden;
}
.zoomimg {
opacity: 1;
display: block;
width: 100%;
height: auto;
transition: .5s ease;
backface-visibility: hidden;
}
.zoomimg-container:hover .zoomimg {
opacity: 0.5;
transform: scale(1.1);
}
.zoomimg-container:hover .zoomimg-content {
opacity: 1;
}
.zoomimg-container .zoomimg-content {
text-align: center;
position: absolute;
bottom: 0;
background: rgb(0, 0, 0); /* Fallback color */
background: rgba(0, 0, 0, 0.5); /* Black background with 0.5 opacity */
color: #f1f1f1 !important;
width: 100%;
padding: 20px;
opacity: 0;
font-size: 18px;
}
.zoomimg-container .zoomimg-content h1{
color: #f1f1f1 !important;
}Show the demo on this page.

Welcome to Jesse Lau's Blog
Website Programing, Internet Marketing, Forex Trading, Billiard, Darts And I Can Stand On One Leg For 30 Minutes With My Eyes Closed. ☺
This method has nothing to do with EXTRA or DIVI, and you do not need to find their ID or class.
Simple is best. Just use basic CSS code to solve problems.
How to Remove Adsense Auto Ads from Homepage in Extra Theme
Yesterday, after adding the ADSENSE auto ads code, I found out there are many advertisements on the homepage this morning, making the homepage difficult to read.
So I decided not to advertise on the homepage.
Google itself has certain requirements for the quality of the pages on which the advertisements are placed. If it is accidentally placed on a page that does not meet the requirements, it will incur a penalty for the account.
For blogs, the most quality pages are frequently updated posts, not the home page or pages about authors, contacts, etc.
Therefore, you need to find a way to block the ad code of other pages, and only keep the code inside the post.
If you only use the AD Unit, EXTRA is easy to implement. It can be set directly in THEME OPTION.
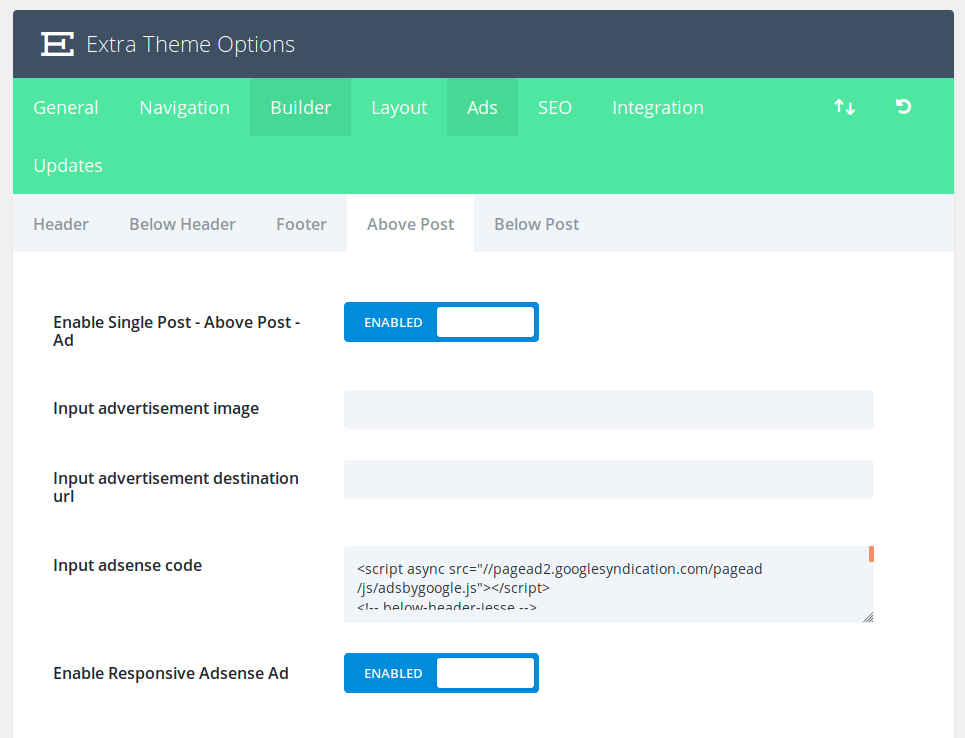
Only advertise in the post, there are two built-in ways, two ads before the post and after the post, this can be directly attached to the code of the Google ad unit.
But Google's AUTO ADS is required to be posted in the head of HTML. This will lead to advertising all pages of the website, which is also a great disadvantage to the user interface.
It seems that I need to change the source code now.
WordPress has a very simple function to determine whether it is a post or something else.
We open the editor to find the header.php file of the EXTRA template, and paste the following code on the line </ HEAD>:
<?php if ( is_single() ) { ?>
<script async src="//pagead2.googlesyndication.com/pagead/js/adsbygoogle.js"></script>
<script>
(adsbygoogle = window.adsbygoogle || []).push({
google_ad_client: "ca-pub-123456789",
enable_page_level_ads: true
});
</script>
<?php }; ?>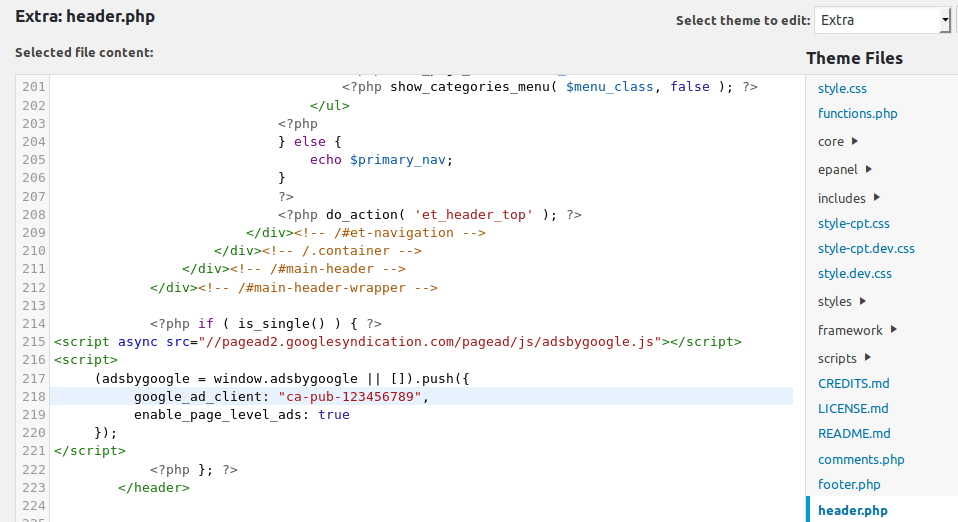
Save and test it. There is no Google's auto ads code on the homepage or on the page now.
Related Articles:
- 2018/09/23 Renovate the Website with Extra Theme, Solve Polylang and Extra incompatibility issues and install ADSENSE code on AMP page
- 2018/09/19 Cancel Redirects to Solve Adsense Down or Unavailable Problem and Make a Custom 404 Page to Make Website More User-Friendly
- 2018/09/18 How to Display “Read More” Links on DIVI Search and Tag Pages
- 2018/09/16 21 Wordpress Plugins Activated in My Website
- 2018/09/16 How to setup Fullwidth Video Background with DIVI and FFMPEG

Authored By Jesse Lau
A freelancer living in New Zealand, engaged in website development and program trading. Ever won 1st ranking twice in the Dukascopy Strategy Contest. This article is licensed under a Creative Commons Attribution 4.0 International License.