Step-by-step Tutorial Show How to Build a Nice Wordpress Blog with Perfect 100 Score of Google Pagespeed Insights and A Rating of SSL Certificate within 2 Hours
2018-09-08
2855 words
14 mins read
My 11-year-old son came back from school on Friday and saw my blog saying, "I want to make a blog too."
The child’s thoughts and enthusiasm should be encouraged. So I decided to use another idle domain name fxdiary.com to go through the process step by step.
Each step was recorded, and everybody can learn how to build a nice Wordpress blog with perfect 100 Score of Google Pagespeed Insights and A rating of SSL Certificate in 2 Hours.
The best of all, you can save big money for just using $3.5/m VPS to make it.
This tutorial is divided into 8 steps.There are quick links:
1. Purchase a domain name
2. Register the host
3. Set DNS to point the domain name to the server ip
4. Remote login to the host to set up a non-root superuser
5. Install and configure the website server software Nginx, database software MySQL, PHP
6. Install LetsEncrypt to build an SSL A-level website
7. Install and configure Wordpress
8. Modify the Nginx configuration and add the necessary plugins to make the site be rated good on Google PageSpeed Insights
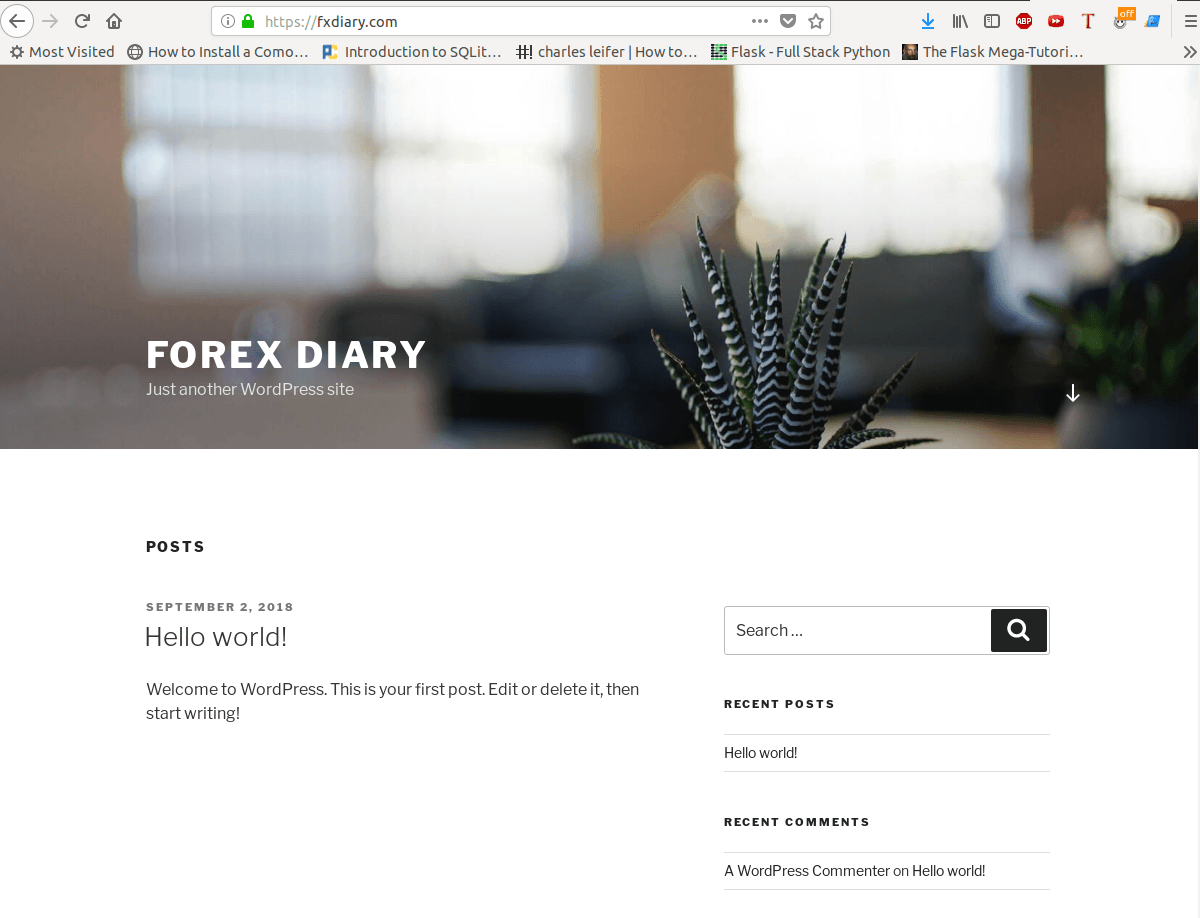
Through this tutorial, my son set up a wordpress website step by step and post his first article (the screenshot on the right, the URL is temporarily confidential). In the course of his progress, he encountered some minor difficulties. I have also revised these one by one. This update add red to some of the code part that you need to modify yourself, so that everyone can follow this configuration.
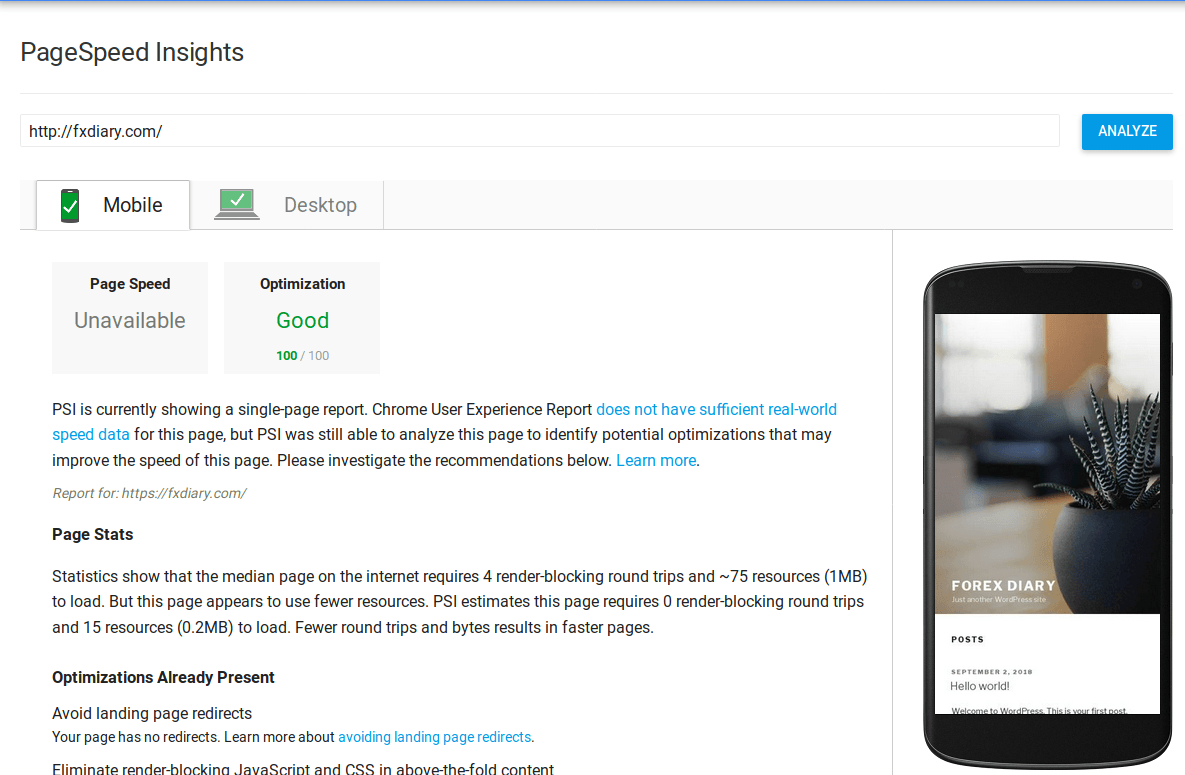
At first, let's take a look at the results of the website that can be achieved in two hours.
Website interface

Google PageSpeed Insights Score 100
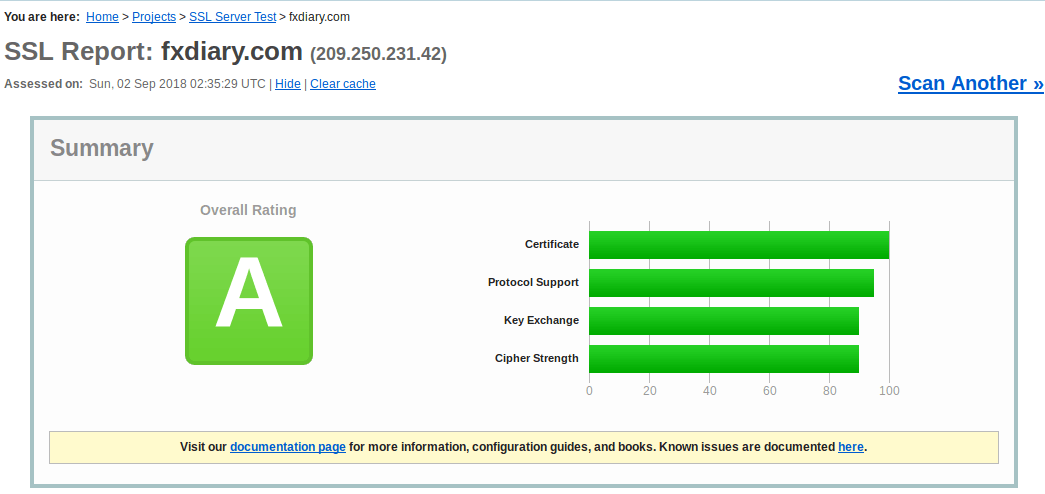
SSL Lab test rating A
Ok, the eight-step tutorial starts :-)
The domain name is very important, it is equivalent to the real estate on the Internet, and the domain name that is suitable for the website theme can bring great added value. Using your own ideas to plan the theme content of the entire website in the future, and then choose a more appropriate domain name is the first step to enter the website business.
There are lots of domain name registration company. This tutorial uses my current namecheap as an example.
Namecheap link
Enter namecheap and click Signup in the upper left corner
Follow the prompts to register your account step by step. After signing up, click on the Domains drop-down menu Domain Search and enter the desired domain name.
Suggestion: It is better to use the domain name of .com for the long run
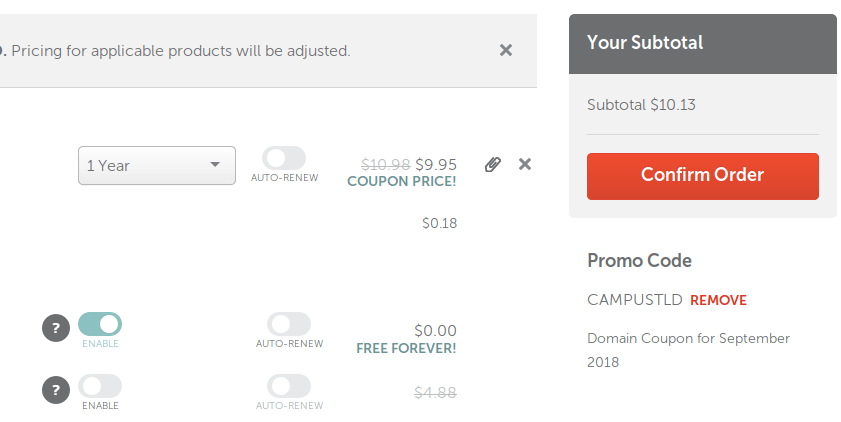
If the domain name you want still exists, congratulations, you can click into the shopping cart, but don't pay the bill now, the namecheap always has coupon code, Google "namecheap coupon" can find a bunch, just test one, it can save 10%, so the cost of registering the domain name: 10.13 dollars a year.
There are also a lot of hosting providers and the competition is fierce. Here is still the example of Vultr I am using now.
Vultr link
Register the account. Log in and click on server-deploy new server
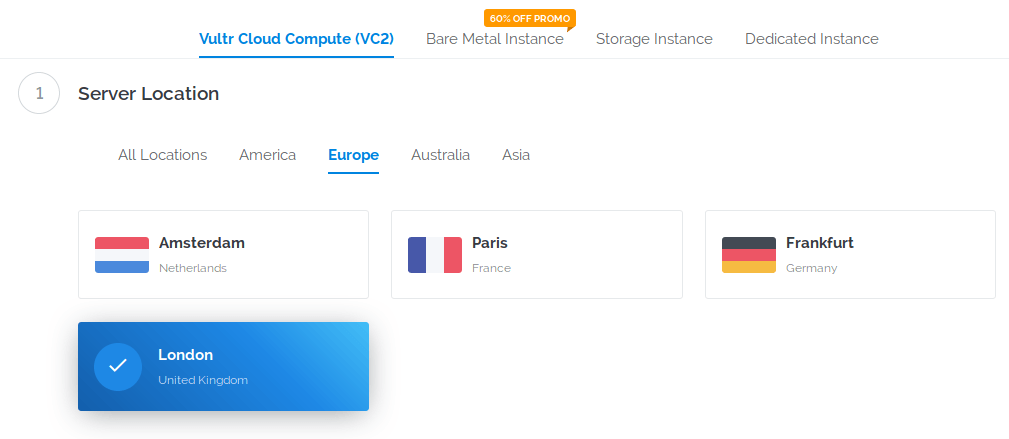
The first step is to choose the server address. Vultr has servers in the US, Europe, Australia, Japan and Singapore. This time fxdiary.com chooses the London server to try it. This doesn't matter much. If you want to change the server in the future, you can basically change it seamlessly.
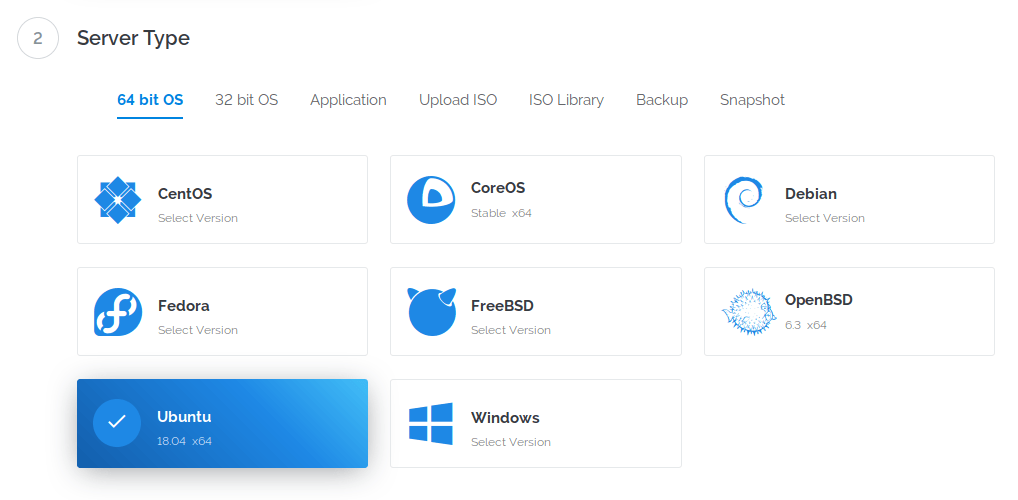
The second step is to choose the operating system, most of which are linux systems, but also optional windows, the price will be more expensive. I personally use the desktop version of Ubuntu 18.04, it feels very good, so of course choose Ubuntu 18.4 64-bit operating system
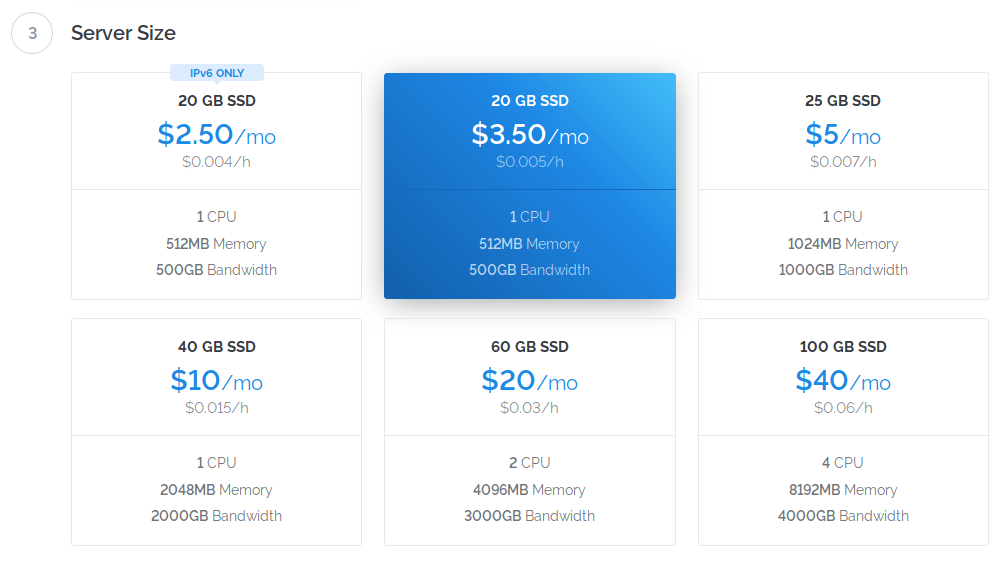
The third step is to select the server hardware. I chose $3.5 option with 500G monthly bandwidth and 500MB memory. Vultr and any other company. In the same way, it is very convenient to pay for the upgrade, seamless docking, and it is troublesome to downgrade the server.
The $2.5 option only supports IPV6. This can't be selected, some users can't access it, and my personal Google Pixel2 phone can't access the pure IPV6 server.
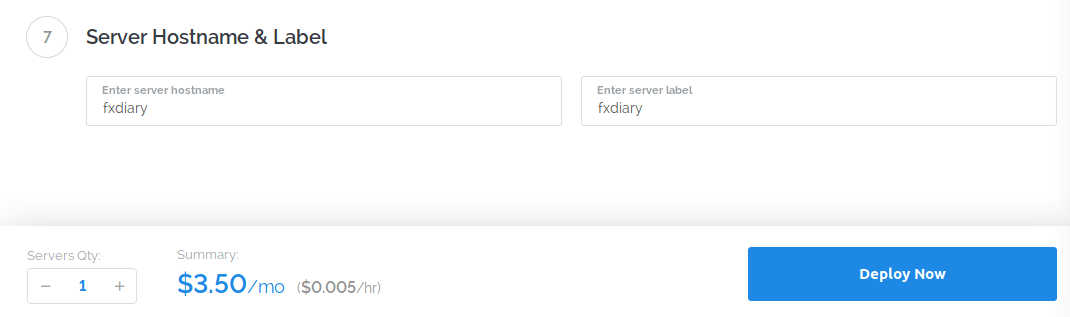
The latter options can be left blank. The server's hostname is filled with fxdiary, then click the Deploy Now button.
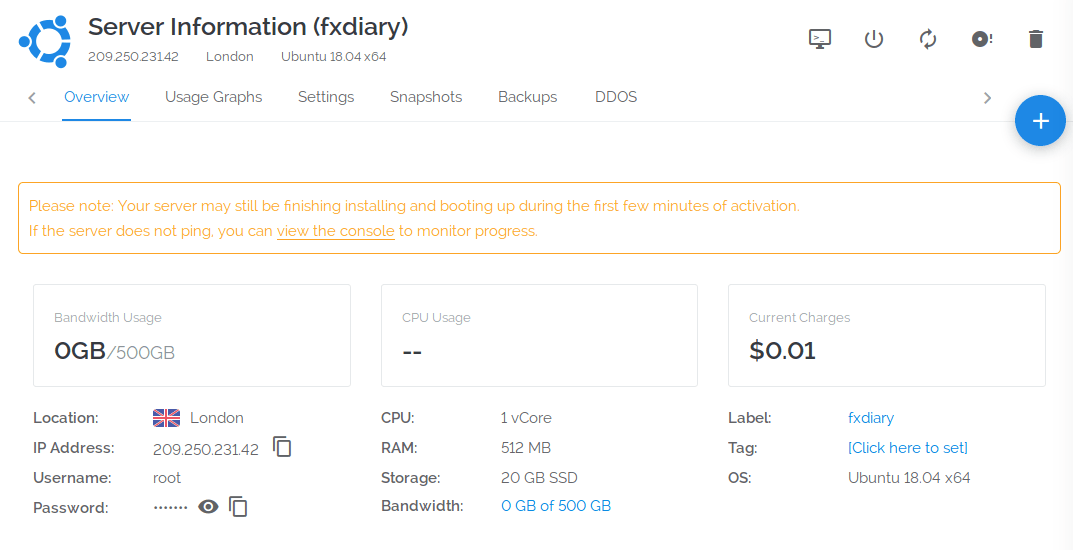
Wait a few minutes for the server to be configured. Click on the fxdiary server, the Ubuntu system is installed, and the root user and password are set.
You also need to spend a small moeny to activate the Backups function, Vultr will back up the server every day, so that system-level errors can be restored to at least one or two days ago. This kind of service requires only $0.70 per month.
At this point, the domain name and host that must be spent have been fixed, cost domain name 10.13 + host (3.50 + 0.70) * 12 = 50.4, a total of 60.43 US dollars per year.
Re-login to namecheap, select the domain name you just bought, and click the manage button. I am here with fxdiary.com as an example.
Click Advanced DNS
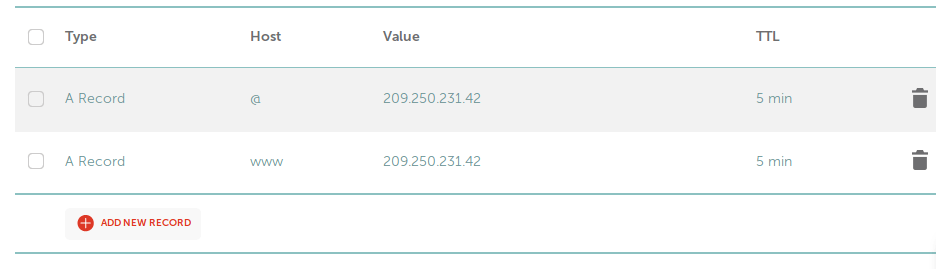
Click ADD NEW RECORD, add two A records, and fill in the server IP address of the Vultr you just purchased.
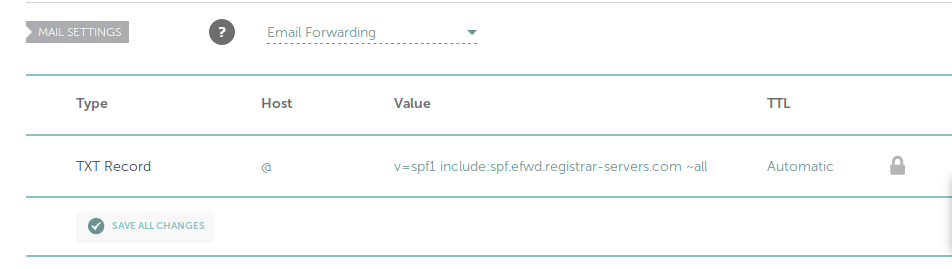
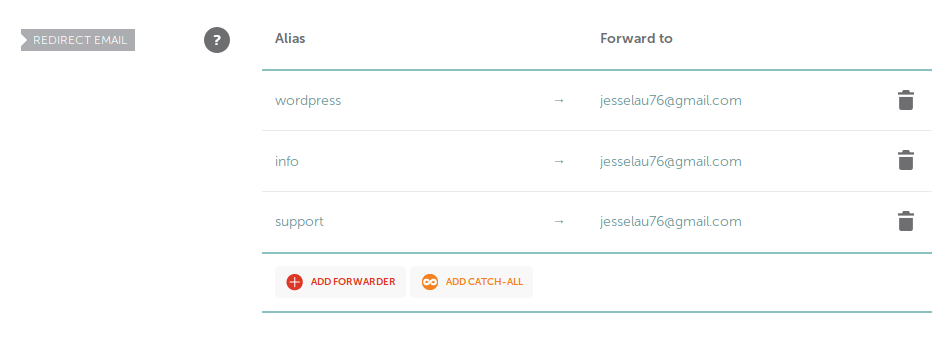
Namecheap provides a free forwarding function, which can forward the domain name suffixed domain name mail to your personal mailbox, such as gmail mailbox, you need to click Mail Setting to activate Email Forwarding function.
Switch from Advanced DNS to Domain and add a few emails to my personal mailbox.
This will send an email to [email protected] [email protected] [email protected] will be forwarded to my gmail mailbox.
The DNS is set up, you can use a secure connection to remotely log in to the host through your PC, and then start installing the setup software.
However, before installing the software, you need to set up a superuser who is not root, because if you log in with root every time, the security is not good, and you may delete or modify the system files at any time, because the root of the host world has absolute power,
At first use ssh command to login host, mac and linux system are very simple, run ssh command with terminal. Windows has integrated the ssh command in win10 or above, otherwise you need to download the independent ssh client like putty, the command is as follows:
Copy the root password set by the vultr host, paste it in the password, and log in successfully.
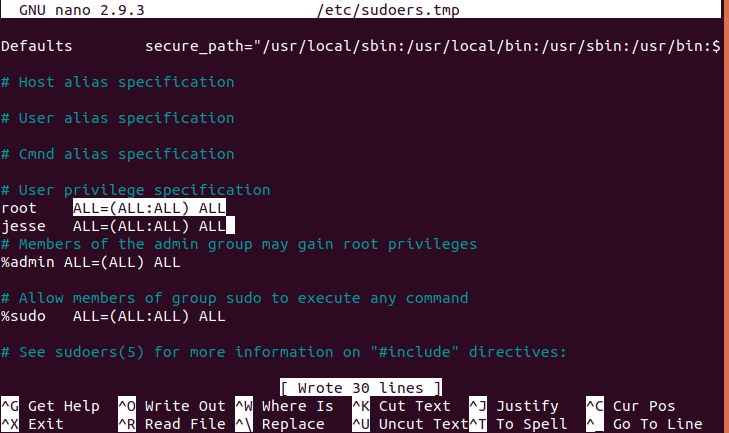
I add a user "jesse" after logging in. Of course you can replace it with any name you want to use, then run the sudo visudo command
It will open the classic Linux editor Nano, find the root line, add the jesse line below, press ctrl x save disk to exit. Now jesse has super user rights.
Run the following lines to set the jesse directory, operation permissions, passwords, and so on.
run
add the following in the last line:
Press Ctrl X to save and exit. Run reboot, the remote server restarts, the connection is interrupted.
Now re-use ssh connection, this time with jesse landing, no problem :-)
Nginx is now the more popular free web server software, more stable and flexible than the old Apache2 and easier to configure. Therefore, my new website uses Nginx. Use jesse to log in to the fxdiary.com host and run the install command:
Then install MySQL
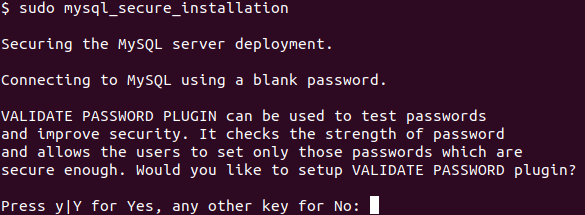
MySQL is very simple to install, but you also need to configure its security, use the following command
The following interface is displayed, answer y
Three password setting levels, choose one and then set the root password, the software will automatically score the password strength, if you are not satisfied, you can reset it.
The next few questions are y.
For Mysql 5.7 or above, the default root is not password, but auth_socket. This needs to be modified, run the command
Sure enough, enter MySQL directly without a password, and then run the command.
Root really is auth_socket
Run the following command to change to password mode
Then run:
This way you can't easily enter mysql.
You can enter the mysql management interface via sudo mysql -u root -p and enter the password
MySQL is installed, now you need to install php
Installed, you need to configure the nginx file
Open an empty file and paste the following codes inside
Press Ctrl-X to save and exit. Then run:
Check the configuration file for any errors, no problem.
run the following command
Add a file to fxdiary.com to test it and run it.
Generate an info.php file with the following two lines
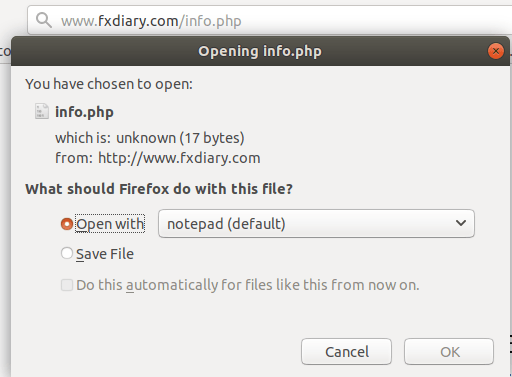
Save and exit, then open a browser to access fxdiary.com/info.php, which can only be opened as a file.
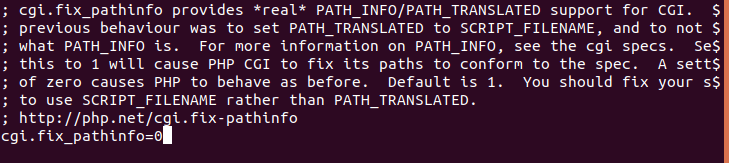
Google to the solution, you need to change the php configuration, run the following command
The file is very large. Press Ctrl-W to search for the word "cgi.fix_pathinfo" to make sure it is equal to 0.
Ctrl-X save and exit. restart php and nginx , as follows
Open the browser and visit fxdiary.com/info.php again, no problem.
You can look at the software versions, modules, etc.
But don't forget to delete this file. Run the following command
Note: The php info file displays various information about the server and is easily exploited by hackers. It must be deleted
Why install SSL? Because Big Google is pushing HTTPS access and even adding the weight of search rankings. Fortunately, the Internet world does not lack high-profile people, all the way down. In addition to the domain name and server host to spend money, all free software is available. The same SSL solution is also free.
Run the following command to install LetsEncrypt on the remote host
Start installing SSL authentication for the domain name with the following command
Enter your own regular email address
All the way choose "Agree". Now is a question of two choices, here we choose 1
Immediately congratulated, and then I need to configure the modified nginx to transfer all HTTP connections to the HTTPS connection.
Change it to the following:
Run the following command to check the configuration of nginx and restart nginx.
Ok, go to the ssl lab to check the following results, level A is appropriate.
Letsencrypt usually expires in 90 days, but Ubuntu's host is best at task schedule, running
Add a line
Ctrl-X to save and exit. This will automatically run the certified update program every Monday at 18:18, and there will be no expiration.
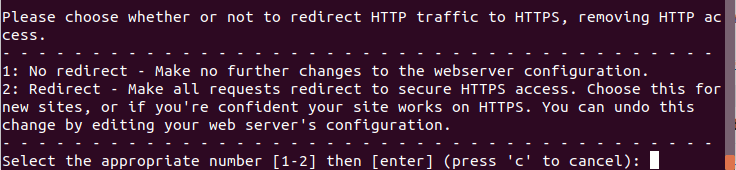
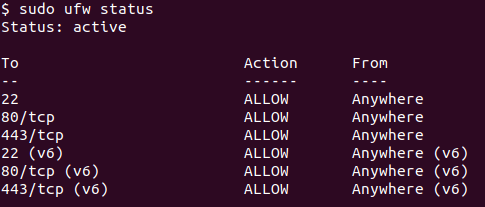
Now add the rules of the firewall to enhance the security of the server, run the following command
Answer yes, then run the following:
See the following results:
This allows the server to open only 22 (SSH), 80 (HTTP), and 443 (HTTPS) ports for security.
Finally, from the background to the front desk, Wordpress is the world's most popular content management system, with countless templates, plug-ins, truly WYSIWYG, greatly improving the fun and productivity of blogging.
Here's how to install and configure WordPress
First set the mysql database Run the following command:
Add a database after entering the mysql command line mode
The wordpress database is set up. To set the username and password, the following commands, username and password can be modified.
No problem, then run the following command to save to mysql and exit the mysql interface
The second step is to install some php plugin for wordpress, the command is as follows
Restart PHP after installation
The third step is to download wordpress, the following command
These lines of commands will download and unzip the final version of WordPress to the /var/www/html directory pointed to by fxdiary.com.
The last step is to set wordpress. Run the following command to get the wordpress password.
A bunch of strings starting with define('AUTH_KEY', ') can be copied to the clipboard or an empty file for re-using. Run the following command to edit the config.php file.
After opening the file, find the bunch of strings starting with define('AUTH_KEY', '), replace it with the string containing the password key, and then find the following sentence and change it to the database name,user name and password in MySQL
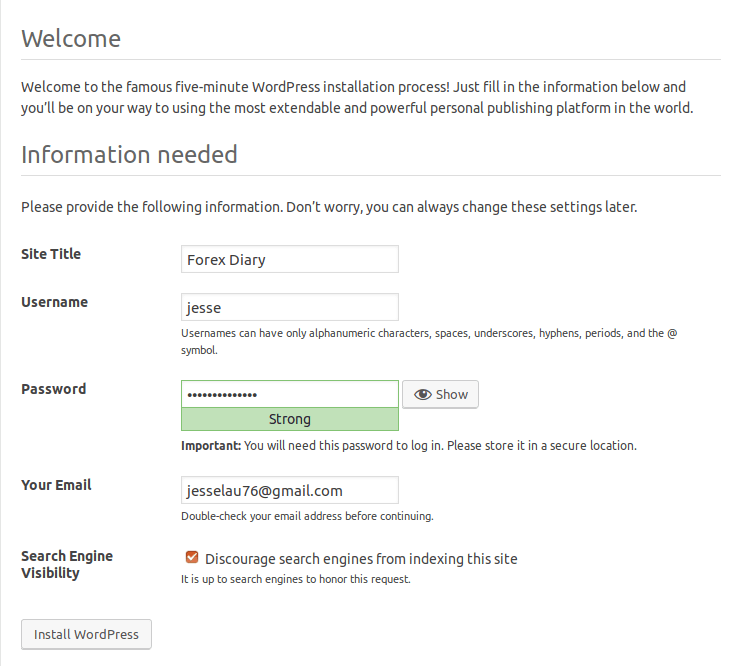
Save and exit. Now the background work is basically completed, you can visit fxdiary.com step by step installation. After selecting the language, you will be in the set interface.
Set the theme of the website, user name and password, and password. After clicking into it, I chose the 2017 template for WordPress. I didn't write anything yet. And the fxdiary.com was built.
The site is basically configured, take a look at Google pagespeed Insights. Poor score
According to its rectification opinion, firstly open the nginx settings file with the editor.
Find gzip and uncomment all gzip options as follows
Save, restart nginx
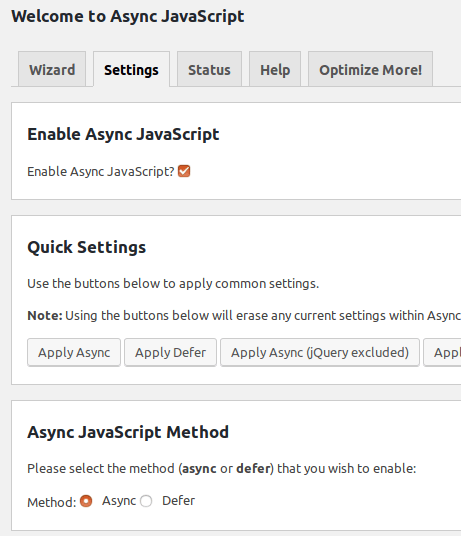
The rectification comments have css and javacript suggestions for asynchronous or deferred processing, download two plugins
Download both to your local hard drive.
Go to fxdiary.com/wp-admin and enter your username and password. Log in to the wordpress management platform and click on Plugin-Add New on the left.
Click Upload Plugin to upload and install two plugins, all activated. Speedup css does not need to be set up, Async Javascript needs to be set up. Select Async Javascript settings
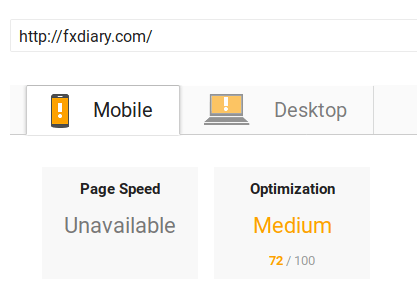
All right. Going to Google again, OK, now 100 points.
Of course, this is because there is nothing in the website yet. It is recommended to install a Pagespeed insights plugin in Chrome or Firefox and test it once for each new page. Make sure it is good (80 points or more), you don't have to pursue 100 points.
The above tutorials are all step by step in the process of configuring fxdiary.com today. If you follow this tutorial, you can easily set up a blog site to take advantage of the powerful wordpress front. If you have configured a new site based on this tutorial, feel free to submit a comment to post a new website link
The child’s thoughts and enthusiasm should be encouraged. So I decided to use another idle domain name fxdiary.com to go through the process step by step.
Each step was recorded, and everybody can learn how to build a nice Wordpress blog with perfect 100 Score of Google Pagespeed Insights and A rating of SSL Certificate in 2 Hours.
The best of all, you can save big money for just using $3.5/m VPS to make it.
This tutorial is divided into 8 steps.There are quick links:
1. Purchase a domain name
2. Register the host
3. Set DNS to point the domain name to the server ip
4. Remote login to the host to set up a non-root superuser
5. Install and configure the website server software Nginx, database software MySQL, PHP
6. Install LetsEncrypt to build an SSL A-level website
7. Install and configure Wordpress
8. Modify the Nginx configuration and add the necessary plugins to make the site be rated good on Google PageSpeed Insights
Update

Through this tutorial, my son set up a wordpress website step by step and post his first article (the screenshot on the right, the URL is temporarily confidential). In the course of his progress, he encountered some minor difficulties. I have also revised these one by one. This update add red to some of the code part that you need to modify yourself, so that everyone can follow this configuration.
At first, let's take a look at the results of the website that can be achieved in two hours.
Website interface
Google PageSpeed Insights Score 100
SSL Lab test rating A
Ok, the eight-step tutorial starts :-)
1. Purchase a domain name
The domain name is very important, it is equivalent to the real estate on the Internet, and the domain name that is suitable for the website theme can bring great added value. Using your own ideas to plan the theme content of the entire website in the future, and then choose a more appropriate domain name is the first step to enter the website business.
There are lots of domain name registration company. This tutorial uses my current namecheap as an example.
Namecheap link
Enter namecheap and click Signup in the upper left corner
Follow the prompts to register your account step by step. After signing up, click on the Domains drop-down menu Domain Search and enter the desired domain name.
 Suggestion: It is better to use the domain name of .com for the long run
If the domain name you want still exists, congratulations, you can click into the shopping cart, but don't pay the bill now, the namecheap always has coupon code, Google "namecheap coupon" can find a bunch, just test one, it can save 10%, so the cost of registering the domain name: 10.13 dollars a year.
2. Register the host
There are also a lot of hosting providers and the competition is fierce. Here is still the example of Vultr I am using now.
Vultr link
Register the account. Log in and click on server-deploy new server
The first step is to choose the server address. Vultr has servers in the US, Europe, Australia, Japan and Singapore. This time fxdiary.com chooses the London server to try it. This doesn't matter much. If you want to change the server in the future, you can basically change it seamlessly.
The second step is to choose the operating system, most of which are linux systems, but also optional windows, the price will be more expensive. I personally use the desktop version of Ubuntu 18.04, it feels very good, so of course choose Ubuntu 18.4 64-bit operating system
The third step is to select the server hardware. I chose $3.5 option with 500G monthly bandwidth and 500MB memory. Vultr and any other company. In the same way, it is very convenient to pay for the upgrade, seamless docking, and it is troublesome to downgrade the server.
The $2.5 option only supports IPV6. This can't be selected, some users can't access it, and my personal Google Pixel2 phone can't access the pure IPV6 server.
The latter options can be left blank. The server's hostname is filled with fxdiary, then click the Deploy Now button.
Wait a few minutes for the server to be configured. Click on the fxdiary server, the Ubuntu system is installed, and the root user and password are set.
You also need to spend a small moeny to activate the Backups function, Vultr will back up the server every day, so that system-level errors can be restored to at least one or two days ago. This kind of service requires only $0.70 per month.

At this point, the domain name and host that must be spent have been fixed, cost domain name 10.13 + host (3.50 + 0.70) * 12 = 50.4, a total of 60.43 US dollars per year.
3. Set DNS to point the domain name to the server ip
Re-login to namecheap, select the domain name you just bought, and click the manage button. I am here with fxdiary.com as an example.
 Click Advanced DNS
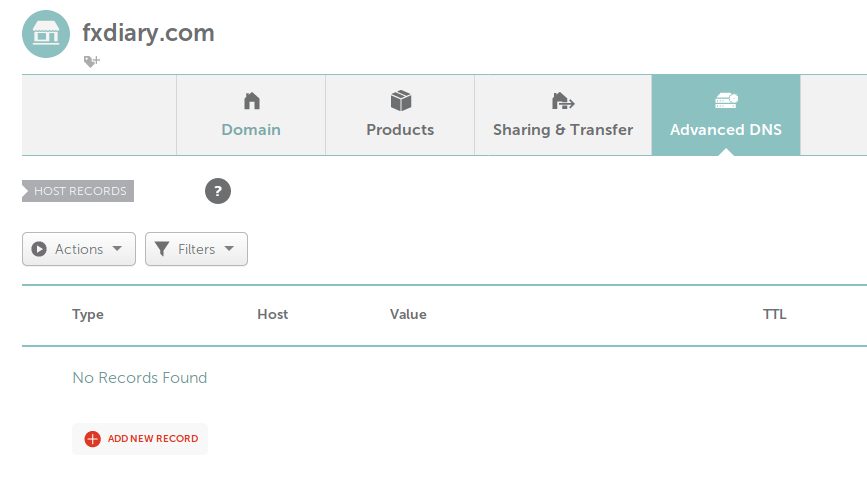
Click ADD NEW RECORD, add two A records, and fill in the server IP address of the Vultr you just purchased.
Namecheap provides a free forwarding function, which can forward the domain name suffixed domain name mail to your personal mailbox, such as gmail mailbox, you need to click Mail Setting to activate Email Forwarding function.
Switch from Advanced DNS to Domain and add a few emails to my personal mailbox.
This will send an email to [email protected] [email protected] [email protected] will be forwarded to my gmail mailbox.
4. Remote login to the host to set up a non-root superuser
The DNS is set up, you can use a secure connection to remotely log in to the host through your PC, and then start installing the setup software.
However, before installing the software, you need to set up a superuser who is not root, because if you log in with root every time, the security is not good, and you may delete or modify the system files at any time, because the root of the host world has absolute power,
Absolute power will inevitably lead to absolute corruption.At first use ssh command to login host, mac and linux system are very simple, run ssh command with terminal. Windows has integrated the ssh command in win10 or above, otherwise you need to download the independent ssh client like putty, the command is as follows:
ssh root@fxdiary.comCopy the root password set by the vultr host, paste it in the password, and log in successfully.

I add a user "jesse" after logging in. Of course you can replace it with any name you want to use, then run the sudo visudo command
# useradd jesse
# sudo visudoIt will open the classic Linux editor Nano, find the root line, add the jesse line below, press ctrl x save disk to exit. Now jesse has super user rights.
Run the following lines to set the jesse directory, operation permissions, passwords, and so on.
# mkdir /home/jesse
# chown jesse:jesse /home/jesse -R
# sudo passwd jesserun
# sudo nano /etc/passwdadd the following in the last line:
jesse❌1000:1000::/home/jesse:/bin/bashPress Ctrl X to save and exit. Run reboot, the remote server restarts, the connection is interrupted.
# rebootNow re-use ssh connection, this time with jesse landing, no problem :-)

5. Install and configure the website server software Nginx, database software MySQL, PHP
Nginx is now the more popular free web server software, more stable and flexible than the old Apache2 and easier to configure. Therefore, my new website uses Nginx. Use jesse to log in to the fxdiary.com host and run the install command:
sudo apt update
sudo apt install nginxThen install MySQL
sudo apt install mysql-server-5.7MySQL is very simple to install, but you also need to configure its security, use the following command
sudo mysql_secure_installationThe following interface is displayed, answer y
Three password setting levels, choose one and then set the root password, the software will automatically score the password strength, if you are not satisfied, you can reset it.
The next few questions are y.
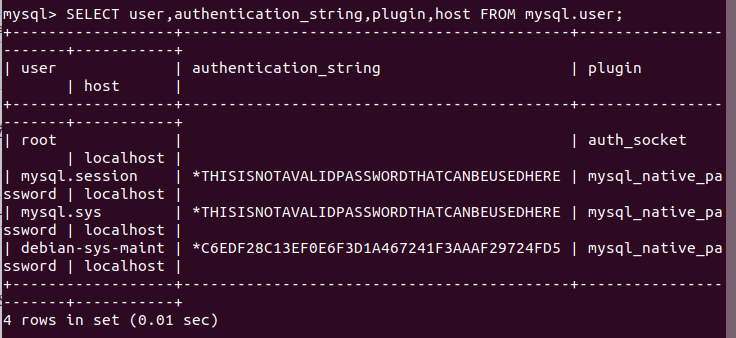
For Mysql 5.7 or above, the default root is not password, but auth_socket. This needs to be modified, run the command
sudo mysqlSure enough, enter MySQL directly without a password, and then run the command.
SELECT user,authentication_string,plugin,host FROM mysql.user;Root really is auth_socket
Run the following command to change to password mode
ALTER USER 'root'@'localhost' IDENTIFIED WITH mysql_native_password BY 'yourjustsetuppassword';Then run:
FLUSH PRIVILEGES;
exit;This way you can't easily enter mysql.
You can enter the mysql management interface via sudo mysql -u root -p and enter the password
MySQL is installed, now you need to install php
sudo apt install php-fpm php-mysqlInstalled, you need to configure the nginx file
sudo nano /etc/nginx/sites-available/fxdiary.comOpen an empty file and paste the following codes inside
server
{
listen 80;
listen [::]:80; ## listen for ipv6
root /var/www/html;
index index.php index.html index.htm index.nginx-debian.html;
server_name fxdiary.com www.fxdiary.com;
location /
{
try_files $uri $uri/ =404; }
location ~ .php$
{
include snippets/fastcgi-php.conf;
fastcgi_pass unix:/var/run/php/php7.2-fpm.sock;
}
location ~ /.ht
{
deny all;
}
}Press Ctrl-X to save and exit. Then run:
sudo nginx -tCheck the configuration file for any errors, no problem.
run the following command
sudo ln -s /etc/nginx/sites-available/fxdiary.com /etc/nginx/sites-enabled/
sudo systemctl reload nginxAdd a file to fxdiary.com to test it and run it.
sudo nano /var/www/html/info.phpGenerate an info.php file with the following two lines

Save and exit, then open a browser to access fxdiary.com/info.php, which can only be opened as a file.
Google to the solution, you need to change the php configuration, run the following command
sudo nano /etc/php/7.2/fpm/php.iniThe file is very large. Press Ctrl-W to search for the word "cgi.fix_pathinfo" to make sure it is equal to 0.
Ctrl-X save and exit. restart php and nginx , as follows
sudo service php7.2-fpm restart
sudo service nginx restartOpen the browser and visit fxdiary.com/info.php again, no problem.
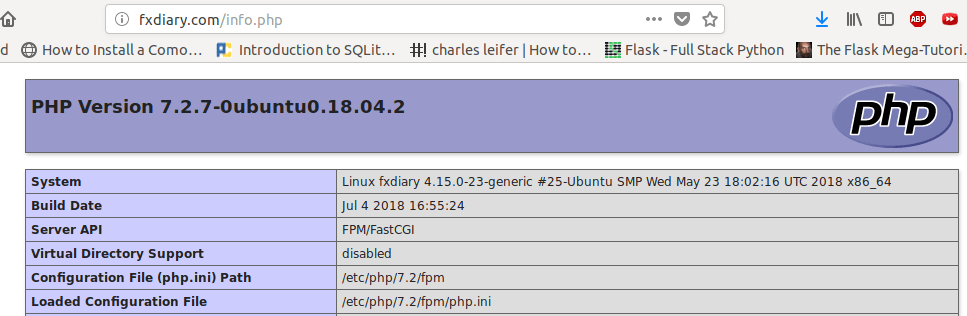
You can look at the software versions, modules, etc.
But don't forget to delete this file. Run the following command
sudo rm -f /var/www/html/info.phpNote: The php info file displays various information about the server and is easily exploited by hackers. It must be deleted
6. Install LetsEncrypt to build an SSL A-level website
Why install SSL? Because Big Google is pushing HTTPS access and even adding the weight of search rankings. Fortunately, the Internet world does not lack high-profile people, all the way down. In addition to the domain name and server host to spend money, all free software is available. The same SSL solution is also free.
Run the following command to install LetsEncrypt on the remote host
sudo add-apt-repository ppa:certbot/certbot
sudo apt install python-certbot-nginxStart installing SSL authentication for the domain name with the following command
sudo certbot --nginx -d fxdiary.com -d www.fxdiary.comEnter your own regular email address

All the way choose "Agree". Now is a question of two choices, here we choose 1
Immediately congratulated, and then I need to configure the modified nginx to transfer all HTTP connections to the HTTPS connection.
sudo nano /etc/nginx/sites-available/fxdiary.comChange it to the following:
server {
listen 80;
listen [::]:80; ## listen for ipv6
server_name fxdiary.com www.fxdiary.com;
return 301 https://$server_name$request_uri;
}
server {
listen 443 ssl http2;
listen [::]:443 ssl http2; # managed by Certbot
server_name fxdiary.com www.fxdiary.com;
root /var/www/html;
index index.php index.html index.htm index.nginx-debian.html;
location = /favicon.ico { log_not_found off; access_log off; }
location = /robots.txt { log_not_found off; access_log off; allow all; }
location ~* \.(css|gif|ico|jpeg|jpg|js|png|woff)$ {
expires max;
log_not_found off;
}
location / {
try_files $uri $uri/ /index.php$is_args$args;
}
location ~ \.php$ {
include snippets/fastcgi-php.conf;
fastcgi_pass unix:/var/run/php/php7.2-fpm.sock;
}
location ~ /\.ht {
deny all;
}
ssl_certificate /etc/letsencrypt/live/fxdiary.com/fullchain.pem; # managed $
ssl_certificate_key /etc/letsencrypt/live/fxdiary.com/privkey.pem; # manage$
include /etc/letsencrypt/options-ssl-nginx.conf; # managed by Certbot
ssl_dhparam /etc/letsencrypt/ssl-dhparams.pem; # managed by Certbot
}Run the following command to check the configuration of nginx and restart nginx.
sudo nginx -t
sudo service nginx restartOk, go to the ssl lab to check the following results, level A is appropriate.
Letsencrypt usually expires in 90 days, but Ubuntu's host is best at task schedule, running
sudo crontab -eAdd a line
18 18 * * 1 certbot renew --post-hook "systemctl reload nginx"Ctrl-X to save and exit. This will automatically run the certified update program every Monday at 18:18, and there will be no expiration.
Now add the rules of the firewall to enhance the security of the server, run the following command
sudo ufw allow 22
sudo ufw allow http
sudo ufw allow https
sudo ufw enableAnswer yes, then run the following:
sudo ufw statusSee the following results:
This allows the server to open only 22 (SSH), 80 (HTTP), and 443 (HTTPS) ports for security.
7. Install and configure Wordpress
Finally, from the background to the front desk, Wordpress is the world's most popular content management system, with countless templates, plug-ins, truly WYSIWYG, greatly improving the fun and productivity of blogging.
Here's how to install and configure WordPress
First set the mysql database Run the following command:
mysql -u root -pAdd a database after entering the mysql command line mode
CREATE DATABASE wordpress DEFAULT CHARACTER SET utf8 COLLATE utf8_unicode_ci;The wordpress database is set up. To set the username and password, the following commands, username and password can be modified.
GRANT ALL ON wordpress.* TO 'yourusername'@'localhost' IDENTIFIED BY 'yourpassword';No problem, then run the following command to save to mysql and exit the mysql interface
FLUSH PRIVILEGES;
EXIT;The second step is to install some php plugin for wordpress, the command is as follows
sudo apt update
sudo apt install php-curl php-gd php-intl php-mbstring php-soap php-xml php-xmlrpc php-zipRestart PHP after installation
sudo systemctl restart php7.2-fpmThe third step is to download wordpress, the following command
cd /tmp
curl -LO https://wordpress.org/latest.tar.gz
tar xzvf latest.tar.gz
cp /tmp/wordpress/wp-config-sample.php /tmp/wordpress/wp-config.php
sudo cp -a /tmp/wordpress/. /var/www/html
sudo chown -R www-data:www-data /var/www/htmlThese lines of commands will download and unzip the final version of WordPress to the /var/www/html directory pointed to by fxdiary.com.
The last step is to set wordpress. Run the following command to get the wordpress password.
curl -s https://api.wordpress.org/secret-key/1.1/salt/A bunch of strings starting with define('AUTH_KEY', ') can be copied to the clipboard or an empty file for re-using. Run the following command to edit the config.php file.
sudo nano /var/www/html/wp-config.phpAfter opening the file, find the bunch of strings starting with define('AUTH_KEY', '), replace it with the string containing the password key, and then find the following sentence and change it to the database name,user name and password in MySQL
. . .
define('DB_NAME', 'wordpress');
/** MySQL database username */
define('DB_USER', 'yourusername');
/** MySQL database password */
define('DB_PASSWORD', 'yourpassword');
. . .Save and exit. Now the background work is basically completed, you can visit fxdiary.com step by step installation. After selecting the language, you will be in the set interface.
Set the theme of the website, user name and password, and password. After clicking into it, I chose the 2017 template for WordPress. I didn't write anything yet. And the fxdiary.com was built.
8. Modify the Nginx configuration and add the necessary plugins to make the site be rated good on Google PageSpeed Insights
The site is basically configured, take a look at Google pagespeed Insights. Poor score
According to its rectification opinion, firstly open the nginx settings file with the editor.
sudo nano /etc/nginx/nginx.confFind gzip and uncomment all gzip options as follows
gzip on;
gzip_vary on;
gzip_proxied any;
gzip_comp_level 6;
gzip_buffers 16 8k;
gzip_http_version 1.1;
gzip_types text/plain text/css application/json application/javascript text/xml application/xml application/xml+rss text/javascript;Save, restart nginx
sudo service nginx restartThe rectification comments have css and javacript suggestions for asynchronous or deferred processing, download two plugins
Download both to your local hard drive.
Go to fxdiary.com/wp-admin and enter your username and password. Log in to the wordpress management platform and click on Plugin-Add New on the left.
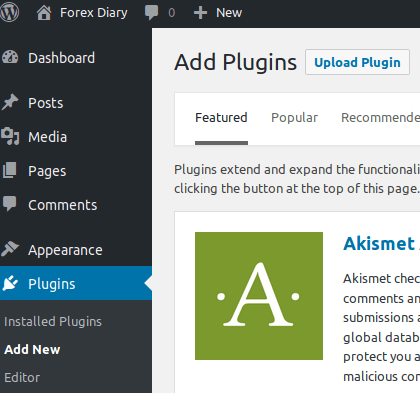
Click Upload Plugin to upload and install two plugins, all activated. Speedup css does not need to be set up, Async Javascript needs to be set up. Select Async Javascript settings
All right. Going to Google again, OK, now 100 points.
Of course, this is because there is nothing in the website yet. It is recommended to install a Pagespeed insights plugin in Chrome or Firefox and test it once for each new page. Make sure it is good (80 points or more), you don't have to pursue 100 points.
The above tutorials are all step by step in the process of configuring fxdiary.com today. If you follow this tutorial, you can easily set up a blog site to take advantage of the powerful wordpress front. If you have configured a new site based on this tutorial, feel free to submit a comment to post a new website link

Authored By Jesse Lau
A freelancer living in New Zealand, engaged in website development and program trading. Ever won 1st ranking twice in the Dukascopy Strategy Contest. This article is licensed under a Creative Commons Attribution 4.0 International License.